Glass items are usually expensive. When you step inside furniture shops or home decoration stores, your eyes will automatically detect glasswares because of their elegance yet for a costly price. Glass pumpkin, considered a home decor, is not exempted from the scenario. In fact, it’s very rare to see glass pumpkins around so its price value is higher than common glassware. People use these pumpkins to add a little bit of sophistication and fall season ambiance in their living room, kitchen, hallways, or others.
But what if you’re on a tight budget to shed off a few dollars for a glass pumpkin? Well, consider it your lucky day to have come across this article because I am about to unfold the secrets of making DIY glass pumpkins for your home! I assure you that this has to be one of the best DIY pumpkin crafts since you won’t be needing a lot of materials plus, it is super easy to follow.
Before you start moving, I need you to gather the tools and supplies below:
1. Three old glass vases
2. Tray (any shape will do as long as it’s big enough for the three vases)
3. Moss
4. Leaves from the dollar tree (or hand-made leaves)
5. Fairy lights or Dollar tree tea lights
6. Transparent tape
7. Aluminum foil
8. Brown fabric
9. Clear hot melt glue
Instructions:
● Step 1 : Get your tray and vases, then just see if these vases fit inside the tray. It’s better if you have a rectangular or square-shaped tray, but it will still depend on how big your vases are.
Also, remember that the vases are the main subject for this project, and they will dictate the aesthetic of the finished product. Therefore, ribbed vases are more preferred since they indicate a pumpkin look. You can also explore and use multicolor vases that are unique in shape or texture.

● Step 2: Tape the fairy lights inside the three vases. You can tape the lights on the top of each pumpkin so it would kind of hang inside. If fairy lights are not available, then you can use dollar tree tea lights instead.
● Step 3: Now, it’s time to do the final position of the three pumpkins inside the tray. After that, just sprinkle the moss on the surface. You know you’re doing it right if the project looks like a tray filled with moss and three pumpkins inside.
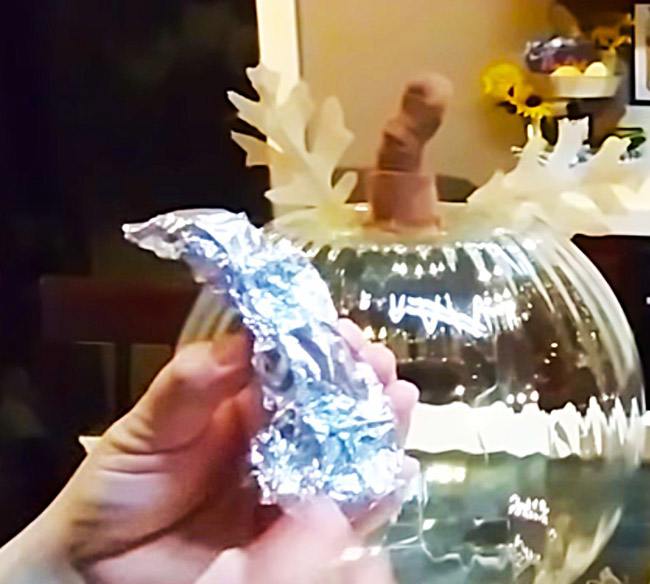
● Step 4: Do a short stem (about 2-3 inches) for each pumpkin. Get a square-shaped foil, fold it like a cone, and shape it according to your preference. Make sure that the top will be skinnier and the bottom part is flat. Now, get your brown fabric and cover the cone. Use hot-glue to let it stick together. After that, paste the stem on top of your glass pumpkins.
● Step 5: Ready your leaves and paste them on the top of the pumpkins (in the side of the stems). After this, your DIY pumpkin craft is ready!
With a little push and creativity, we can make good products out of our own hands. Now, you don’t have to worry about buying expensive decors for the fall season because we are sending this DIY glass pumpkin tips straight to your home!