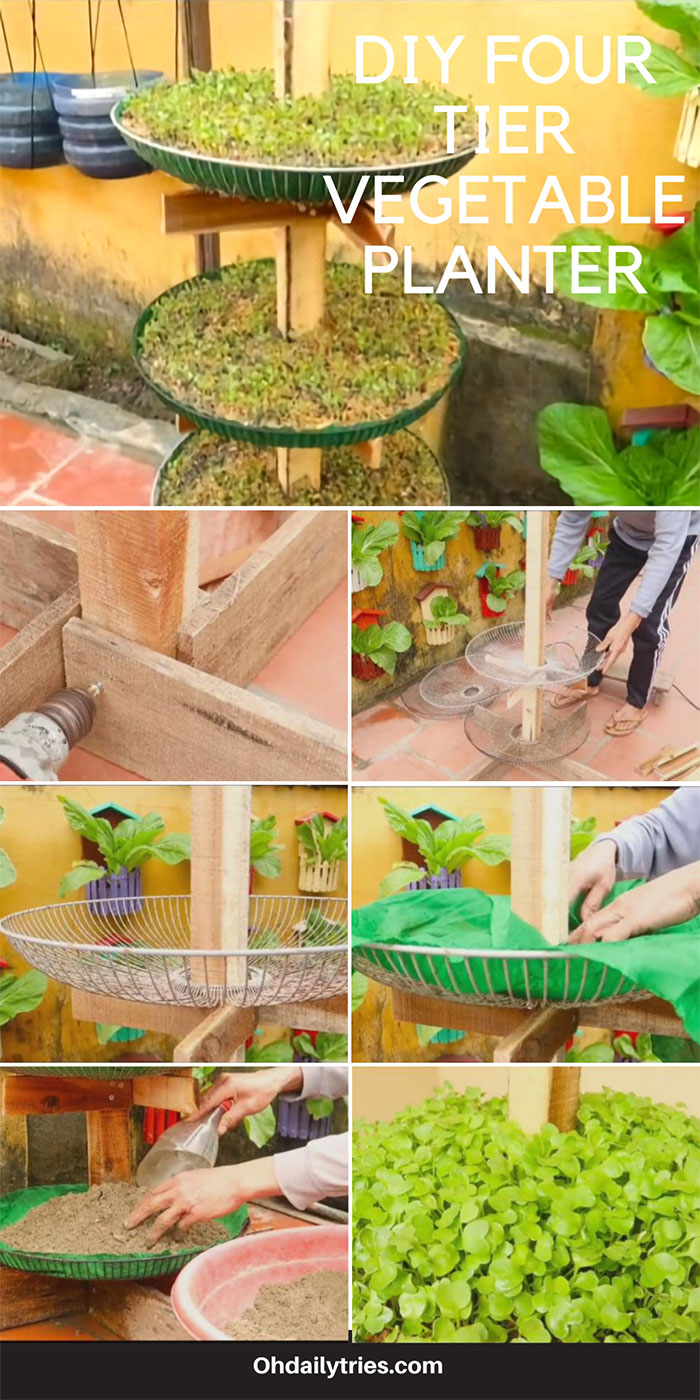
If you are looking to spruce up your backyard with a beautiful vegetable planter, you’ve come to the right place! Here in this DIY, we’ll give a step-by-step tutorial on how you can make a lovely planter for your plants. Put it in any area to add an extra layer of beauty and aestheticism.
Material List
• Long Wooden Pillar Stand
• Wooden Planks (x4)
• Small Wood Planks (x12)
• Electric Drill
• Nails (x16)
• Old Electric Fan Cover (x4)
• Paper Cloth (x4)
• Dirt (or Soil)
• Seeds
• Mulch
• Fertilizer
• Water
• Ruler
Instruction Steps:
1. Set the Long Wooden Pillar Stand upright
2. Lay the Wooden Planks horizontally along each side of the Long Wooden Pillar Stand’s base. Each should be touching their own part of the base and none should be blocking the other’s path
3. Use the Electric Drill to drill 4 Nails into the Wooden Planks. Each nail should be drilled into at least 2 planks at once.
4. Once the foundation is set, lay one of the Open Bottom Bowls through the pillar’s top and onto the base planks. Make sure the bowl has an open bottom so that it can slide down from the top of the pillar without issue.
5. Next, measure at least 3 inches with your Ruler. This is where you will be placing the next base. You can go higher than this if you want but it should at least be 3 inches.
6. Repeat Step 2 with 4 of the Small Wooden Planks and drill into them with the nails
7. Place the second Open Bottom Bowl along the new base and measure at least 3 inches upwards again
8. Repeat Step 6 and Step 7 until there are no more bowls, planks, or nails or until it is at the size you prefer.
9. Place one of the Paper Cloths atop each of the open bottom bowls so that its face is covered. You can cut or customize it however you prefer.
10. Take several cups of Dirt (or Soil) and place them in each of the bowls. There should be enough dirt to completely cover each bowl. Make sure you smooth it out so that it is even throughout each bowl.
11. Next, add the Seeds to each bowl
12. After adding the seeds, cover each bowl with Mulch and Fertilizer
13. Finally, add Water to each of the bowls
And with that, you’re done! Let your seeds have time to grow and you’ll have a beautiful garden/planter in no time!